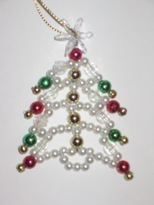
Ornate Bead Christmas Tree Ornament Craft
 This
beaded Christmas tree craft make a cute ornament or decoration for your
presents. While this little creation has been created in green to help set
it off on your green tree, you can also use green beads and use light colored
ornaments for decoration. This
beaded Christmas tree craft make a cute ornament or decoration for your
presents. While this little creation has been created in green to help set
it off on your green tree, you can also use green beads and use light colored
ornaments for decoration.
And please share any crafting ideas that you have with us. we would love
to hear from you.
Craft Supplies Needed
- 1- 18mm plastic crystal cartwheel bead (also known as paddlewheel or
sunburst beads)
- 5- 6mm round plastic red beads
- 8- 6mm plastic round faceted crystal beads
- 4- 6mm round plastic gold beads
- 8- 3mm round plastic gold beads with large holes
- 60- 3mm round plastic pearl beads (approximately)
- 1- 7" length of thin gold cord for hanging the ornament
- 1- 36" length of 22 gauge wire (approximately)
- Wire cutters
- Scissors
Crafting Steps:
- We are going to start with the star on top and the tree trunk. Cut
a piece of wire approximately 6" long, as well as another piece of wire 30"
long.
- Thread both the long and short pieces of wire through the crystal
cartwheel "star" so that the short and the long pieces of wire now will hang
equally out both sides of the cartwheel star. Now twist these two
wires together to secure your cartwheel star, so that four wires now hang
down below the star (two short and two long)
- Slide all four wires (two short, two long) through the 6mm red bead.
- Now the shorter wires will form the trunk of the tree. Put the two
wires together so that they touch. Slide the beads in this order
through both short pieces of the wire: 3mm pearl then 6mm gold.
Repeat this 4 times. This is your tree trunk. Bend the wire a
little so the beads will not fall off, but leave some gap between the beads
so we can weave wire through trunk wires to form the branches.
- Branch one. Now it is time to form the branches. On
each long wire that is currently sticking out of the top red bead, place the
following beads: 3mm white, 6 mm crystal, 3mm white, 6mm green, 3mm
gold. This forms the top branch on each side.
- On each side, loop the wire around the 3mm gold bead, thread back
through the 6mm green bead and then place two more 3mm pearl
beads on the wire. Now thread each long wire through the two tree
trunk wires just below the top most 6mm gold bead on the trunk. After
threading branch wire through the middle trunk wire, thread each wire
through one pearl bead on the other side of the trunk, before
starting branch number two. Now you have the top branch on each side.
- Branch two on each side (shown ion steps 8 and 9 below) is
exactly like steps 5 and 6 except where we have underlined below.
- Now it is time to form the branches. On each long wire that is
currently sticking out of the top red bead, place the following beads: 3mm
white, 6 mm crystal, 3mm white, 6mm red, 3mm gold. This forms the top
branch on each side.
- On each side, loop the wire around the 3mm gold bead, thread back
through the 6mm red bead and then place three more 3mm pearl
beads on the wire. Now thread each long wire through the two tree
trunk wires just below the top most 6mm gold bead on the trunk. After
threading branch wire through the middle trunk wire, thread each wire
through two pearl beads on the other side of the trunk, before
starting branch number two. Now you have the top branch on each side.
- Branch three and four. Repeat steps 8 and 9 two more times
to form the rest of the branches, noting the only difference between the
branches is that you will alternate a green and red bead at the tip of each
branch, and more importantly, you add one more 3mm pearl bead to the bottom
of each successive branch and thread through three 3mm pearl beads on the
other side of the trunk on the third branch and only two beads on the fourth
branch, so we can form the base. (See the difference between steps 6
and 7 versus steps 8 and 9- the differences are underlined)
- You will now have tow wires left dangling from the pearl beads two away
from the trunk just under the last 6mm gold trunk bead. String both
wires through the same five 3mm pearl beads that form the tree base and tie
the wires off on the lowest branch. Cut off the excess wire and guess what-
you are done.
- Enjoy.
Do you love creating Christmas crafts and would like to share them?
Send them to us and join our Top Crafters. The best Christmas craft
ideas will be showcased in our Craft Hall of fame
|
|
|